Getting started with JSSImporter for AutoPkg: Pt 1
Many Mac admins have been relying more and more on AutoPkg to help automate the task of keeping software up to date. I know personally that it was an excellent addition to our school’s software update workflow, which was based around Munki for deployment, and InstaDMG for building install images.
But times change, and our school switched to using the Casper Suite to manage our fleet, and dropped Munki. Suddenly I had to start manually moving packages around and clicky-clicky-creating a ton of policies. This made me sad.

Google Image search “sad” some time. You won’t be disappointed.
Fortunately, a brilliant guy named Allister worked through the mountain of details required to make it a possibility to upload AutoPkg’ed products to a JSS through it’s API, as well as create policies. This was enough to get me off my butt and start working on modifying his jss-autopkg-addon to meet our organization’s needs. This led in a multitude of directions; I created a python wrapper around the entire set of API features (as well as some non-API features) and refactored and rewrote Allister’s original work into something that was much more flexible, albeit way more complicated to set up.
So that’s where this series of blog posts fits in. I’m going to detail the process of setting up the JSSImporter and crafting recipes that meet some different workflow demands. Obviously, you’ll need a working installation of AutoPkg first, and it wouldn’t hurt to have a test JSS set up to practice with prior to rolling things out for production purposes. Really, the primary role of AutoPkg and JSSImporter for us is to provide a means for keeping our testers stocked with the latest software, so some instability is always expected anyway. While it’s certainly possible to pump packages straight into your production pipeline, in general, this is just to populate the testing environment with the latest and greatest, and thus is probably not mission-critical. So experimentation is good!
Our first order of business, then, is to grab the latest JSSImporter installerpackage and install it. You don’t need to fool around with git or anything; just grab the package. Don’t Google Image search “grab the package”.
In this, first installment, we’re just going to configure JSSImporter and use the recipes I’ve put into my jss-recipes repo. We will talk about how to write our own recipes, handle problem packages, and plan and customize our deployment workflow, in future posts.
The first thing we need to do is provide some information to JSSImporter about the JSS and how to access it, and what resources it has available. If you’ve configured AutoPkg, you should be familiar with how to do this. We are going to add the following keys to our com.github.autopkg.plist file:
- JSS_URL
- API_USERNAME
- API_PASSWORD
First, you should create an account on your JSS that will be used for API access, probably even just for AutoPkg. It will need “Create”, “Read”, and “Update” privileges on
- Categories
- Computer Groups
- Distribution Points
- Extension Attributes
- Packages
- Policies
- Scripts
To add the keys to your AutoPkg prefs:
defaults write com.github.autopkg JSS_URL https://test.jss.org:8443
defaults write com.github.autopkg API_USERNAME apiUser
defaults write com.github.autopkg API_PASSWORD apiPassword
Substitute your information for the final values above. The URL needs to be complete–include the protocol and the port!
The next part is the tricky one: adding in your distribution points. And it’s tricky only in the sense that you either need to hand-edit some XML or you need to use the esoteric “plistbuddy”. Since we’re going to be writing recipes later, it makes sense to not avoid typing any XML and just edit the darn thing. There’s one caveat here though-don’t forget that on contemporary OS X systems, if you edit a preference file (i.e. .plist) the settings don’t take effect until the preferences system syncs. This can lead to some mystifying issues, so get in the habit of doing a defaults read com.github.autopkg each time you edit the preferences.
Fire up vim or I suppose some other text editor and add a section to ~/Library/Preferences/com.github.autopkg.plist that looks like this:
<key>JSS_REPOS</key>
<array>
</array>
Now, for each distribution point you would like to have AutoPkg and JSSImporter upload to, you need to add a dict of values. Each Casper setup is different, so take a look at the README for detailed information on each type. For demonstration purposes, I’ll just configure a single AFP distribution point.
The documentation lets me know that using the auto-discovery for AFP/SMB shares, I only need a name and password (for the Read/Write enabled user on the share) for an AFP share. My preferences file should now have this section:
<key>JSS_REPOS</key>
<array>
	<dict>
		<key>name</key>
		<string>USRepository</string>
		<key>password</key>
		<string>abc123</string>
	</dict>
</array>
And that’s all I need to get started. Again, check the README for details on setting up your JDS, or issues regarding multiple DP’s, etc.
Next, we’ll use autopkg’s command line to add in my jss-recipes:
autopkg repo-add https://github.com/sheagcraig/jss-recipesYou can now run any of these recipes with autopkg run. e.g.
autopkg run Evernote.jssBut what does it do?
My recipes are based around the idea of making packages for testing available to a subset of computers on campus. At a somewhat abstract level, what happens is that the JSSImporter processor will take the package spit out by the standard Evernote.pkg recipe and then try to set up all of the pieces of the puzzle needed to distribute it to testing computers.
First it ensures that the categories exist for the package and for the policy, creating them if they’re missing, and just leaving them alone otherwise. The Evernote recipe will ensure “Productivity” for the package, and “Testing” for the policy.
Next, the JSSImporter ensures an object representing our package exists on the API. Again, I say “ensure” rather than “creates”, as it will try to reuse an existing package object rather than make a new one so that you don’t get your JSS all crudded up with duplicates.
Once there is a package object, the JSSImporter will upload the package to every configured distribution point or distribution server. This process can take quite long, especially for some of the giant Apple packages like Logic or GarageBand. In our case, the package will be uploaded as “Evernote-6.0.3.pkg”, with a category of “Productivity”.
The next step is the JSSImporter will ensure that any needed extension attributes are present. (None are needed for Evernote).
So far, so good. Next, groups are handled. Again, JSSImporter ensures that they exist. My recipes all create a smart group for each product. For most of them, the smart group criteria is looking to find computers which are members of the static group “Testing” (which is how I specify which computers are “Testing” computers), and have the “Application Title” in question, with an “Application Version” which does not match the one for our package. Note that this is not the same thing as “older than” or “with a lesser version number”, as there’s no way to do that without extension attributes (maybe I’ll cover how to handle that later!). So in our example, the Evernote recipe will ensure an up-to-date smart group named “Evernote-update-smart” is present, with criteria of “Application Title” of “Evernote.app”, “Application Version” “is not” “6.0.3”, and is a “member of” the computer group “Testing”.
Said another way, our policy will be available to all computers which I have manually placed into the “Testing” group, with any Evernote version that does not match the one I am uploading.
Next, the JSSImporter ensures that any scripts needed for installation are available on the JSS. None are needed for Evernote, but some products need a pre-install or post-install script to make sure everything works correctly.
The policy is handled next. The important details for the policies are that they are scoped to the “Evernote-update-smart” group as expected. They are “enabled” immediately. They have a “category” of “Testing” so they are all grouped together in Self Service and in the JSS->Policies page. They are triggered through Self-Service only (meaning not at Check-In, Logout, etc). And finally, they are set to the “frequency” of “ongoing”. However, they have a final “maintenance” step of running a recon, so if everything installed correctly, the recon will pop them out of the smart group, and the user can’t install a second time. (The “ongoing” frequency allows us to update this policy when the next Evernote update comes out, and the user can again install without us having to go and “Flush” the policy logs like we would with a “Once per Computer” frequency. The goal is to be as hands-off as possible).
Finally, the JSSImporter makes sure that an icon file is available for the Self Service policy to display.
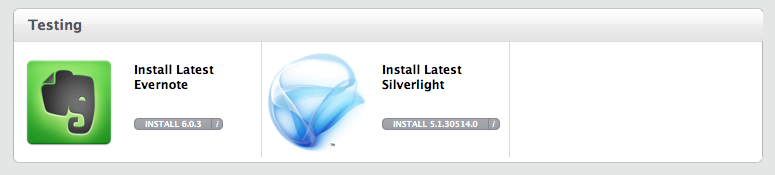
A user with a computer in the “Testing” group can thus open up Self-Service, authenticate, and pop the “install” button on the Testing->”Install Latest Evernote” button. The slick thing is that the Install Evernote option will only appear to a computer that doesn’t already have that version. Once Self-Service downloads and installs the policy, a recon is run which will discover the newer version of Evernote, and the computer will fall out of the “Evernote-update-smart” group until the next update comes out.
Since there can be a lag between when we post updates, and the latest recon on a computer, I provide a self-service policy to my testers that will trigger a recon, after which all currently available updates should be available.
That concludes the first installment. Next, we’ll look at adapting an already working package recipe to the workflow outlined above and creating a JSS recipe.
If you’re really really into Python, here’s a fresh python-print blazer from Roberto Cavelli: