How We Are Removing Adware
Over the last few months the number of mac laptops at our organization with adware infections has slowly gone from nonexistent, to a slow trickle, to, prior to the amelioration I’m about to describe, about 10% of our managed macs having some blacklisted file present.
Update:All you reckless folks using 9.7 already, guess what? The “Execute Command” described below doesn’t work. Stand by for a way to do this using a script that is bulletproof.
Update: It turns out that if you try to run yo from a Casper policy using the Files and Processes/Execute Command task, yo will run, but never do anything. I don’t quite grasp why this is, because it works if you login or ssh in and do sudo jamf policy, but not if the trigger runs “naturally. Fortunately @golby and I figured out an alternate. Use open /Applications/Utilities/yo.app --args -t "Adware Detected" as your command (substitute your desired arguments of course!). Updated in the post below as well.
Update: People have been really enthusiastic about both yo and the AdwareCheck extension attribute. So I started expanding AdwareCheck into something even better. Check out SavingThrow for more power!
I blogged about the first one of these adware packages that we’ve had to deal with: here. Researching that, while fun, was also time consuming. Fortunately, Apple just released an article detailing files to look for and procedures to use to remove common adware programs.
My todo list included several items like “write an extension attribute to detect projectX” and “write automated removal script for projectX”. With Apple’s KBase article, the research was all done; I just had to implement it.
And then, the prolific Allister Banks taunted me with his solution to detecting adware as an extension attribute. This was the kick in the butt I needed.
So I wrote a quick one up myself that also adds in the ability to remove the files. You can check it out HERE
But that’s just the first piece of the puzzle. Now, what do we do with it? How can you implement this procedure yourself?
First off, this procedure is based around us using the Casper Suite to manage our fleet, but it is conceivable to use this method as a template for applying to any other management system.
First, I added the AdwareCheckExtensionAttribute.py script to our JSS via the Management Settings/Computer Management/Extension Attributes menu:
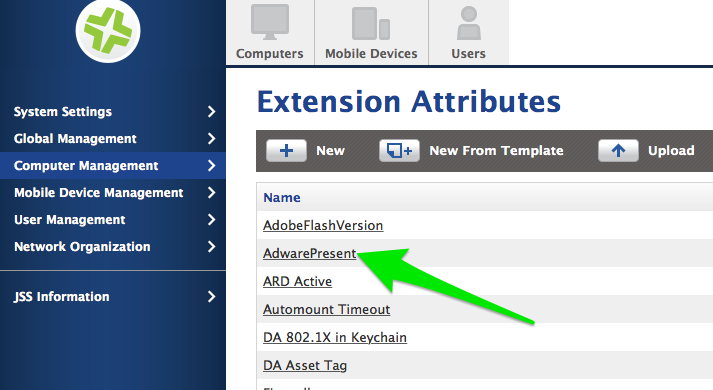
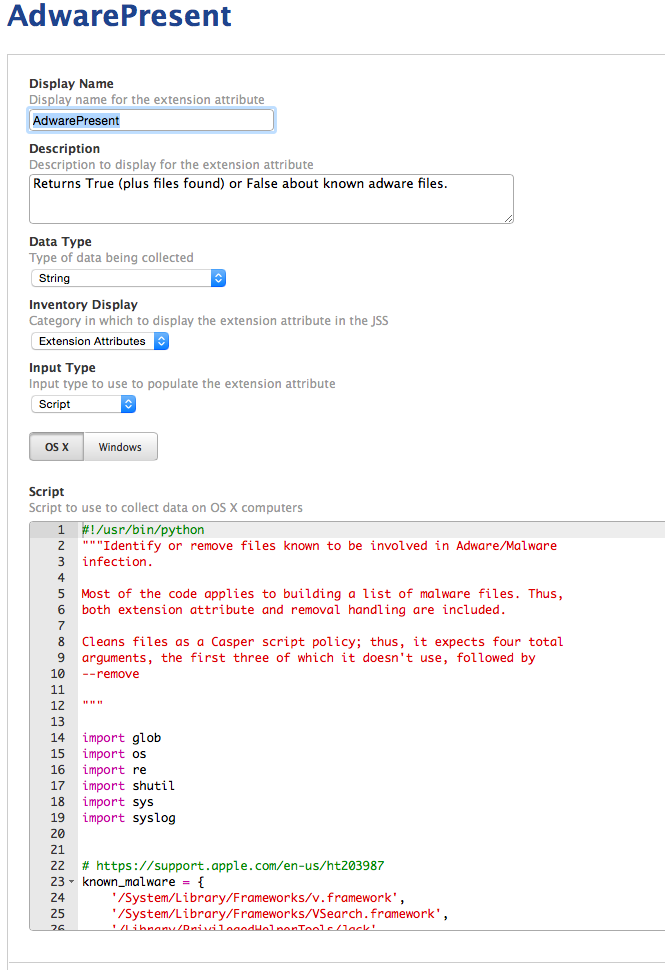
Check the above screenshot for the correct extension attribute settings!
Next, I created a smart group to collect computers which had been identified as infected by dirty adware:
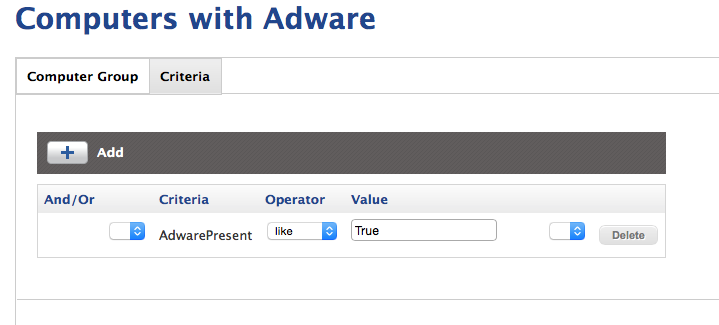
Notice, the criteria is that the value of AdwarePresent is like True. This is because the extension attribute also reports back which specific files were found, so it will never report back exactly True.
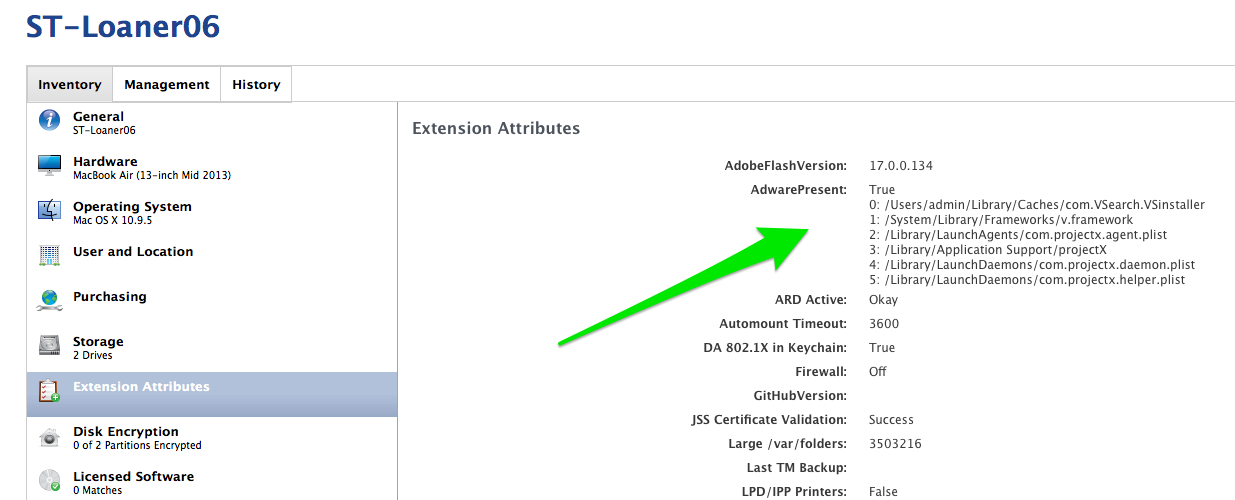
This is a nice added feature for IT; we like to be able to see what exactly the user has acquired in their web surfing.
At this point, after computers start to recon, you should start to see some results! Who has been handing out their admin privileges willy-nilly?
Now, on to how to excise the infection!
As a group, we decided to force the users to have to manually remove the adware themselves. We felt that, unlike many of the Windows crapware that we see, our Mac users had to actively authenticate and install these adware programs, and this was our opportunity to do some targeted training. While we could have automatically detected the adware and removed it without them ever knowing, we felt like it was better to force them to become aware of the situation.
I have been working on another little project that displays OS X user notifications. terminal-notifier already does this, but it does so rather politely. I wanted a notification that wouldn’t go away until the user interacted with it. So I wrote yo in Swift. The project includes an already built app that you can grab and install with no screwing around. If you really really really want to use your organization’s logo or some other icon AND ONLY that icon, yo has a README that details the process of changing this icon and building the project.
The next step, then, was to craft a policy to install the yo app to /Applications/Utilities on our fleet. I made a custom-build for our organization that uses our logo, and deployed it across campus. Once that was safely in place, it was time to remove some adware.
First, add the AdwareCheckExtensionAttribute.py file to your scripts through Casper Admin or the Management/Computer Management/Scripts page so that it’s available for your policy.
The next step was to create a Self Service policy named “Remove Adware”. Please take a close look at the screenshots for the exact settings, and I’ll detail the important bits below.
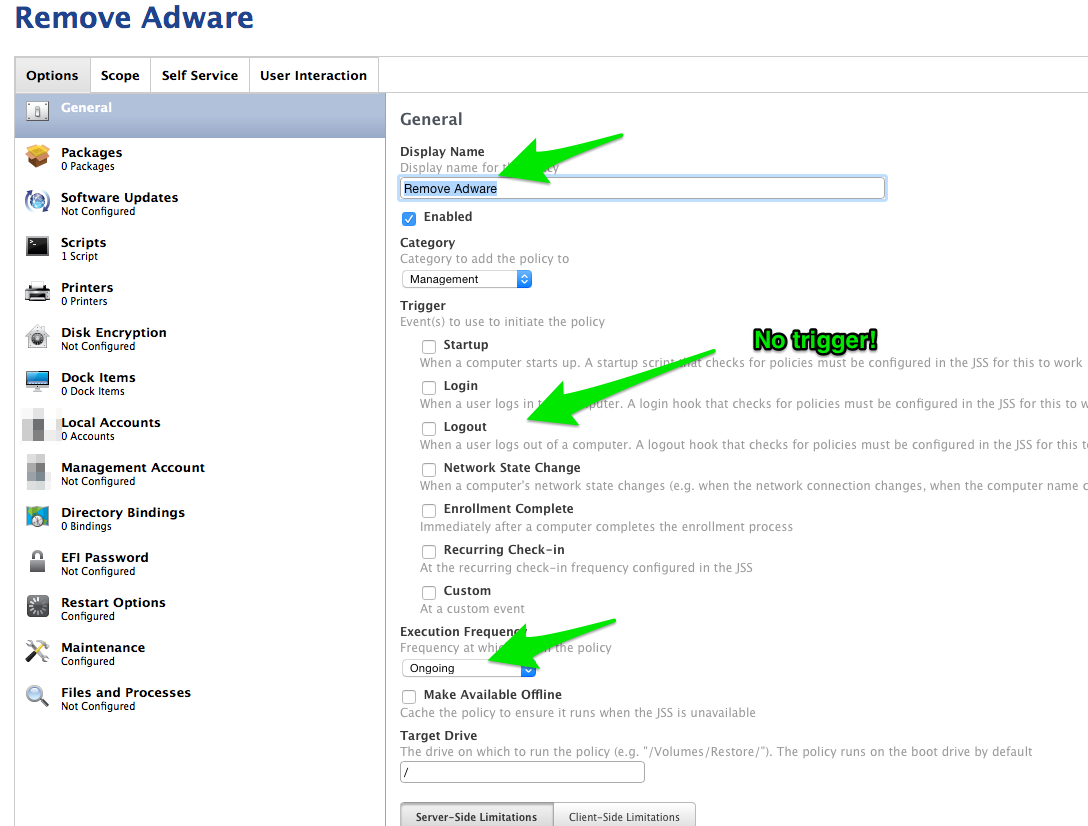
Create a new policy, naming it something appropriate (Remove Adware?). Make sure that it doesn’t trigger off of any of the general page triggers, since it will be a self-service policy.
The frequency should be “Ongoing” because you want the policy to be available as long as the user’s computer tests True for Adware.

In the “Scripts” section, select the AdwareCheckExtensionAttribute.py script and set the “Parameter 4” value to “ –remove”. This is how the script knows its in removal mode vs. extension attribute mode.
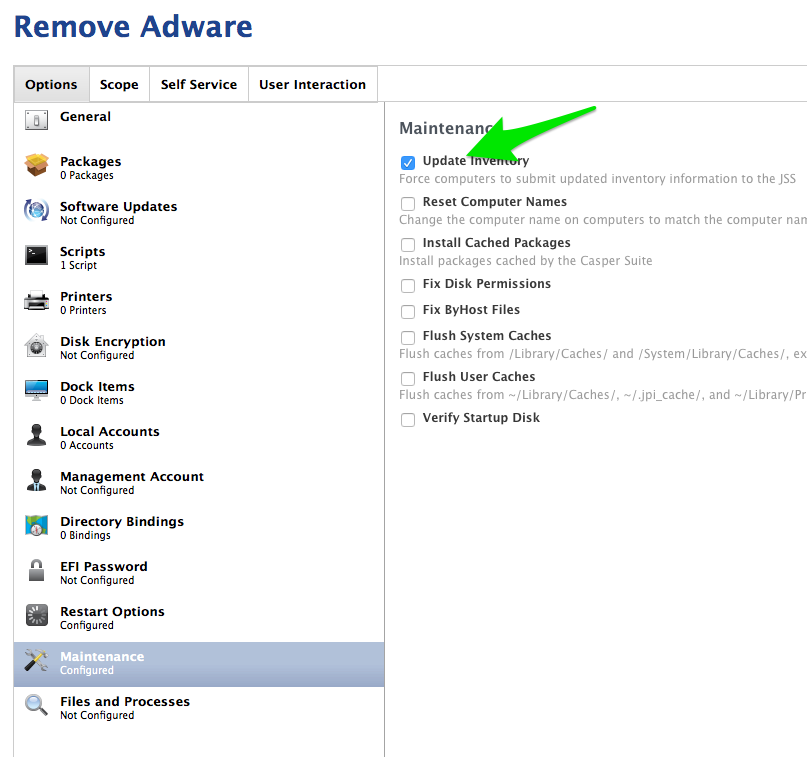
Next, add a Maintenance/Update Inventory task to the policy so that the computer has a chance to drop out of the smart group.
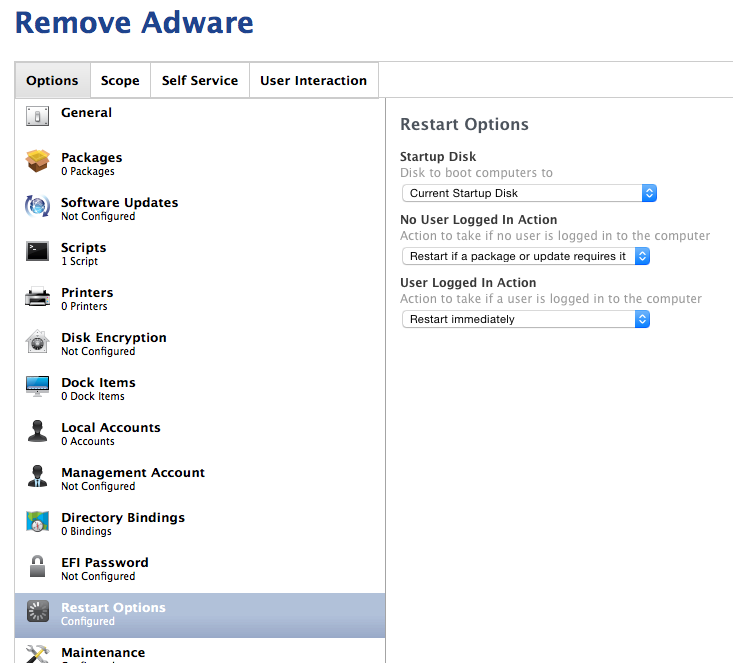
Finally, set the Maintenance/User Logged In Action to “Restart Immediately”. Since some of the adware has multiple launchd jobs running, and it’s complicated to remove them in the “correct” order, it’s much easier to just force a restart on the user. (This will be addressed to the user in the Self Service section to come…)
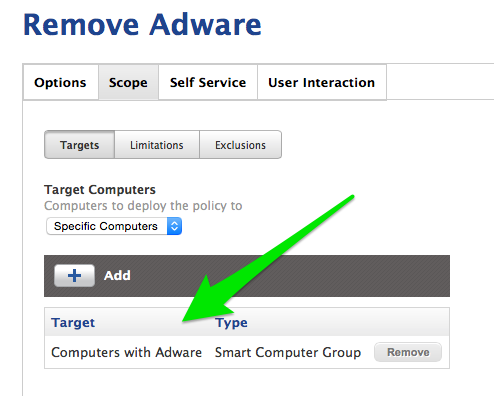
Scope the policy to the smart group you created above.
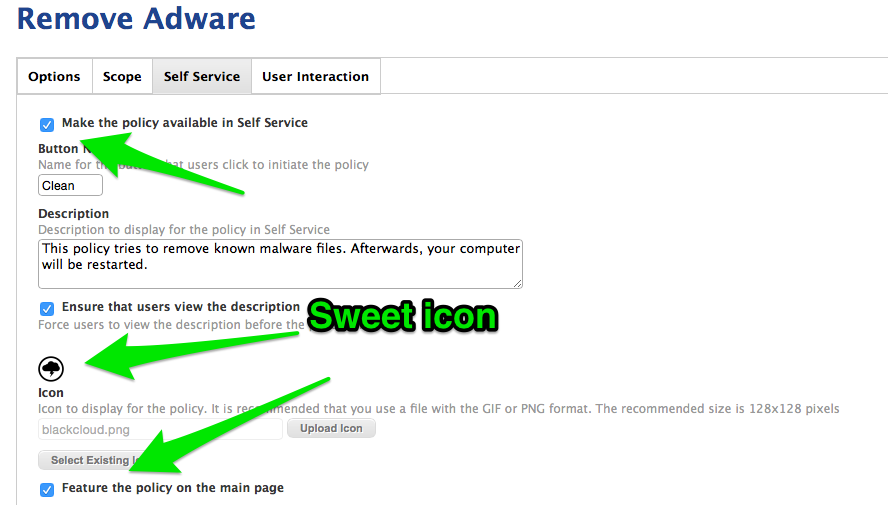
Finally, in the Self Service tab, select “Make the policy available in Self Service” toggle. I also set the button name and icon to be more helpful.
I put in a short description of what would happen, and, importantly, that it would require a restart. I also selected the “Ensure that users view description” to make sure that they are forced to “read” this description. I put “read” in quotation marks because they won’t necessarily read it, but it’s the best we can do!
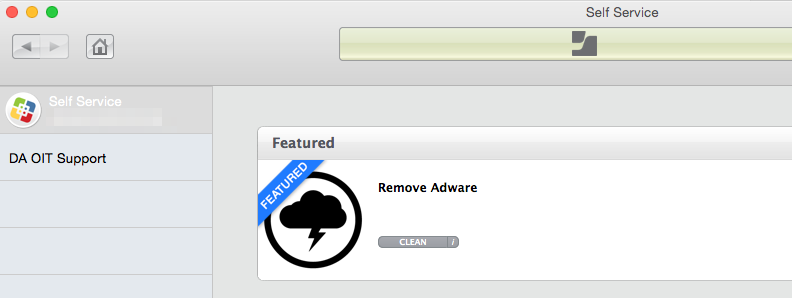
Checking the “Feature the policy on the main page” button puts the policy front and center for infected users. The best part is that this policy won’t show up for computers not in the smart group, so you don’t have to worry about it interfering with “normal” operation.
Once the self service policy has been created, anyone in the Adware smart group can now remove their adware. Once all of the preceding work is done, the last step is to notify the users that they have adware, hopefully directing them towards Self Service.
Create one final policy, titled “Notify Users of Adware” or something similar.
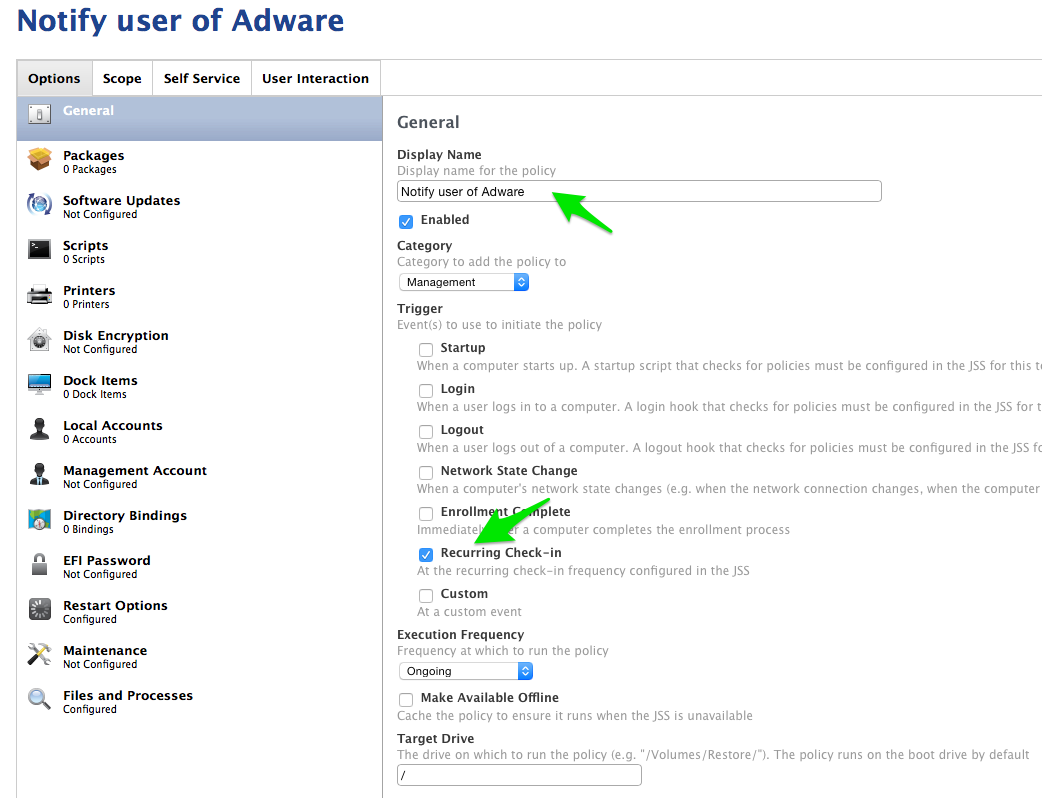
Here, I selected the Recurring Check-In trigger. The notification won’t fire off if the user is not logged in (which I could handle better in yo…), and it also won’t work if we use the Login trigger, since it occurs before the UI is fully set up. Trust me-recurring check-in is fine!
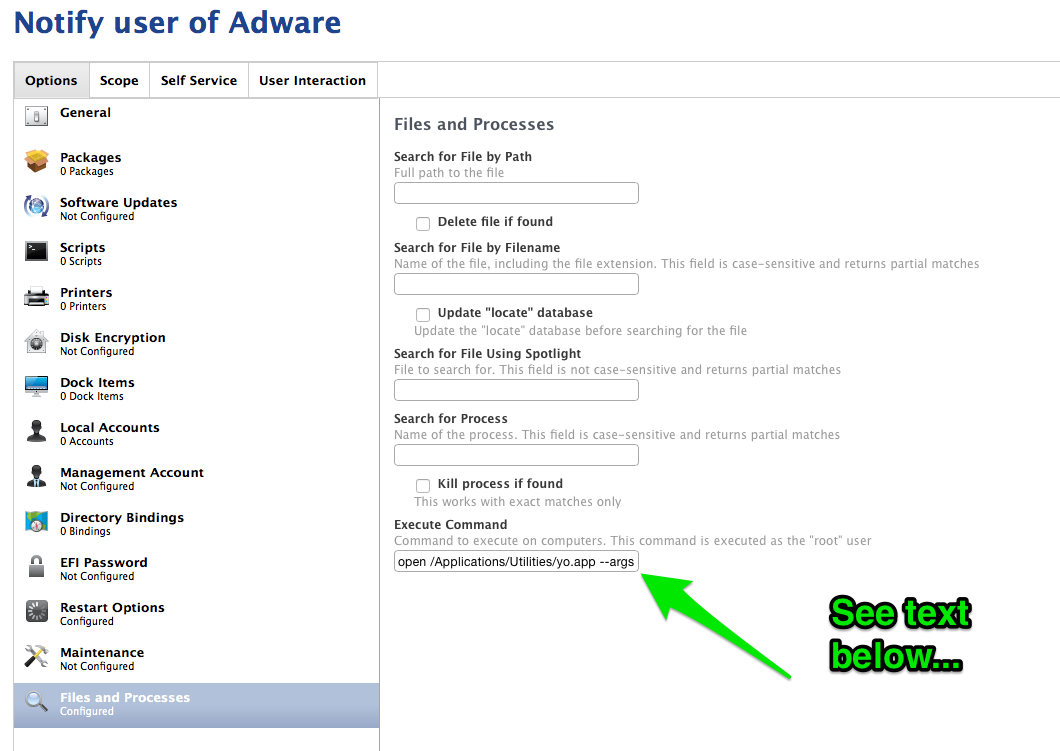
Next, set up a Maintenance/Execute Command task with the following call to yo:
open /Applications/Utilities/yo.app --args -t 'Adware detected' -b 'Clean' -n 'Please remove with Self Service: Remove Adware.' -a '/Applications/Self Service.app';logger 'Sending adware notification.'The -t argument is the notification’s title, the -b sets the text on the action button, and the -n argument sets the body text on the notification. The -a is a path to the Self Service app. This is passed to the /usr/bin/open commandline program as an argument; in our case, it says that, when someone clicks on the notification’s “action” button (titled “Clean” in this example), Self Service should be opened. The extra logger command at the end has the dual purpose of logging to the system log and ensuring that our policy exits 0, rather than failing due to a mysterious error.
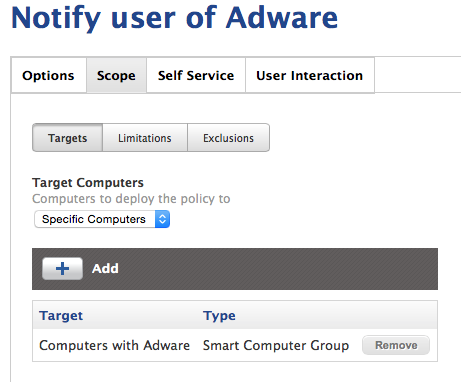
And lastly, scope the policy to our adware smart group.
Once you hit save, computers who have been added to the smart group after their last recon determined that they had an adware infection will have a policy scoped to them to pop the notification on screen.

They can then click on the clean button, authenticate Self Service, and run the Clean Adware policy to clean and reboot their computer.
This is all well and good… But to take it to the next level, maybe I’ll write a JSS recipe so that you can AutoPkg/JSSImporter this entire procedure to your JSS with no other work than running the recipe.
